by Sam Tackeff | Jun 29, 2009 | Baking, Daring Bakers
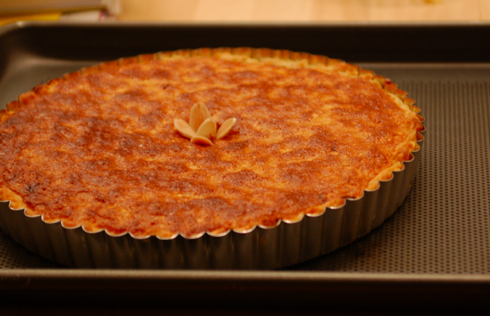
The June Daring Bakers’ challenge was hosted by Jasmine of Confessions of a Cardamom Addict and Annemarie of Ambrosia and Nectar. They chose a Traditional (UK) Bakewell Tart… er… pudding that was inspired by a rich baking history dating back to the 1800’s in England.
This is the perfect tart to serve as a thin slice in the afternoon with tea, or for dessert, or, even well… for breakfast. The basic recipe is a shortcrust, thinly spread with any lovely jam or curd that you have on hand, topped with frangipane – an almond, butter and egg concoction. I used strawberry jam, out of a jar. Next time I’m making my own, I promise.
Bakewell Tart…er…pudding
Makes one 23cm (9” tart)
sweet shortcrust pastry + one cup jam or curd, warmed for spreadability + frangipane
Sweet shortcrust pastry
225g (8oz) all purpose flour
30g (1oz) sugar
2.5ml (½ tsp) salt
110g (4oz) unsalted butter, cold (frozen is better)
2 (2) egg yolks
2.5ml (½ tsp) almond extract (optional)
15-30ml (1-2 Tbsp) cold water
Sift together flour, sugar and salt. Grate butter into the flour mixture, using the large hole-side of a box grater. Using your finger tips only, and working very quickly, rub the fat into the flour until the mixture resembles bread crumbs. Set aside. Lightly beat the egg yolks with the almond extract (if using) and quickly mix into the flour mixture. Keep mixing while dribbling in the water, only adding enough to form a cohesive and slightly sticky dough. Form the dough into a disc, wrap in cling and refrigerate for at least 30 minutes.
Frangipane
125g (4.5oz) unsalted butter, softened
125g (4.5oz) icing sugar
3 (3) eggs
2.5ml (½ tsp) almond extract
125g (4.5oz) ground almonds
30g (1oz) all purpose flour
Cream butter and sugar together for about a minute or until the mixture is primrose in colour and very fluffy. Scrape down the side of the bowl and add the eggs, one at a time, beating well after each addition. The batter may appear to curdle. In the words of Douglas Adams: Don’t panic. Really. It’ll be fine. After all three are in, pour in the almond extract and mix for about another 30 seconds and scrape down the sides again. With the beaters on, spoon in the ground nuts and the flour. Mix well. The mixture will be soft, keep its slightly curdled look (mostly from the almonds) and retain its pallid yellow colour.
Assembling the tart
Place the chilled dough disc on a lightly floured surface. If it’s overly cold, you will need to let it become acclimatised for about 15 minutes before you roll it out. Flour the rolling pin and roll the pastry to 5mm (1/4”) thickness, by rolling in one direction only (start from the centre and roll away from you), and turning the disc a quarter turn after each roll. When the pastry is to the desired size and thickness, transfer it to the tart pan, press in and trim the excess dough. Patch any holes, fissures or tears with trimmed bits. Chill in the freezer for 15 minutes.
Preheat oven to 200C/400F.
Remove shell from freezer, spread as even a layer as you can of jam onto the pastry base. Top with frangipane, spreading to cover the entire surface of the tart. Smooth the top and pop into the oven for 30 minutes. Five minutes before the tart is done, the top will be poofy and brownish. Remove from oven and strew flaked almonds on top and return to the heat for the last five minutes of baking.
The finished tart will have a golden crust and the frangipane will be tanned, poofy and a bit spongy-looking. Remove from the oven and cool on the counter. Serve warm, with crème fraîche, whipped cream or custard sauce if you wish. When you slice into the tart, the almond paste will be firm, but slightly squidgy and the crust should be crisp but not tough.
by Sam Tackeff | May 27, 2009 | Baking, Cheese, Daring Bakers, Turkish

The technical details: The May Daring Bakers’ challenge was hosted by Linda of make life sweeter! and Courtney of Coco Cooks. They chose Apple Strudel from the recipe book Kaffeehaus: Exquisite Desserts from the Classic Cafés of Vienna, Budapest and Prague by Rick Rodgers. And many thanks of course to Lisa of La Mia Cucina and Ivonne of Cream Puffs in Venice.
The assignment: Strudel dough, filling of our choice. I knew I didn’t want apple filling, because, well, it just feels wrong to be eating apples in May, even though I now live in California, and I suppose I could get a nice, ripe, seasonally grown local apple if I looked hard enough.
So what did I choose? The Sigara Borek – a Turkish favorite of my childhood.
These things are crispy, fried, filled with white cheese and parsley, perfect for breakfast, an afternoon tea with guests, or to snack on while watching sports.
Mine are a bit of a bastardized version that ended up looking like dark fried wontons – because I had to use whole wheat bread flour instead of white, and then didn’t roll the stuff out as thin as I should have. The phyllo, or Yufka (Turkish phyllo) versions look a lot more golden. If you are going to make home made dough, it has to be done well in advance – the dough takes at least 90 minutes to sit.
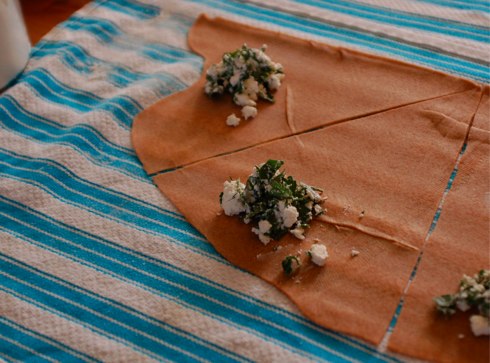
The best part is that they can be made in advance, and then frozen – so you can pop them out and fry them in a little oil whenever you need them fresh.
But what if I’m looking after my health? Well, I also, in the spirit of Daring Bakers, tried a baked version, and another version which involves baking in water. Were they good you ask? As you can tell, neither of them are posted. So, that’s the beauty of freezing these guys, you can make three at a time, and not feel terrible about eating them all.
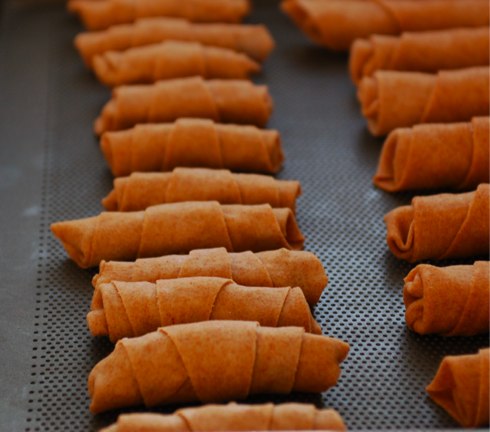
Sigara Borek
(makes a whole bunch, easily freezable)
Ingredients:
– a package of phyllo dough (or the Streudel Dough recipe below if you are up for a challenge)
– about 3/4 lb of white cheese (I use Bulgarian feta, or Valbreso the closest equivalents here in the states)
– a cup or more of freshly chopped parsley
– a little bit of water, for sealing the rolls
– vegetable oil, for panfrying
Method:
This works best as an assembly line:
1. Prepare the dough, by laying a flat sheet and cutting it into triangles (or if, you are rolling your own dough, roll it into a round shape, and cut out triangles like pizza slices).
2. Prepare filling: super easy! just mix the cheese and your really big handful of parsley together.
3. Spoon filling (about a heaping tablespoon) onto the wide end of the triangle (see my picture above), and then fold in the two sides, and roll up the end, using a little bit of water as glue to stick the end together. It’s easiest if you spoon the filling on a bunch of triangles and then roll them up one after another.
4. About here you can freeze the ones you aren’t going to be eating right away – freeze individually on a baking pan to keep them from sticking, and then once frozen, you can put them in a big ziplock together.
To eat: just fry for a few minutes in some vegetable oil, about a 1/4 inch deep on medium high heat, turning until all sides are golden brown (about 2-4 minutes). Note, if you use phyllo dough, they won’t have quite the bubble wonton look that mine do.
Home made dough:
from “Kaffeehaus – Exquisite Desserts from the Classic Cafés of Vienna, Budapest and Prague” by Rick Rodgers
1 1/3 cups (200 g) unbleached flour
1/8 teaspoon salt
7 tablespoons (105 ml) water, plus more if needed
2 tablespoons (30 ml) vegetable oil, plus additional for coating the dough
1/2 teaspoon cider vinegar
1. Combine the flour and salt in a stand-mixer fitted with the paddle attachment. Mix the water, oil and vinegar in a measuring cup. Add the water/oil mixture to the flour with the mixer on low speed. You will get a soft dough. Make sure it is not too dry, add a little more water if necessary. Take the dough out of the mixer. Change to the dough hook. Put the dough ball back in the mixer. Let the dough knead on medium until you get a soft dough ball with a somewhat rough surface.
2. Take the dough out of the mixer and continue kneading by hand on an unfloured work surface. Knead for about 2 minutes. Pick up the dough and throw it down hard onto your working surface occasionally. Shape the dough into a ball and transfer it to a plate. Oil the top of the dough ball lightly. Cover the ball tightly with plastic wrap. Allow to stand for 30-90 minutes (longer is better).
3. It would be best if you have a work area that you can walk around on all sides like a 36 inch (90 cm) round table or a work surface of 23 x 38 inches (60 x 100 cm). Cover your working area with table cloth, dust it with flour and rub it into the fabric. Put your dough ball in the middle and roll it out as much as you can. Pick the dough up by holding it by an edge. This way the weight of the dough and gravity can help stretching it as it hangs. Using the back of your hands to gently stretch and pull the dough. You can use your forearms to support it.
4. The dough will become too large to hold. Put it on your work surface. Leave the thicker edge of the dough to hang over the edge of the table. Place your hands underneath the dough and stretch and pull the dough thinner using the backs of your hands. Stretch and pull the dough until it’s about 2 feet (60 cm) wide and 3 feet (90 cm) long, it will be tissue-thin by this time. Cut away the thick dough around the edges with scissors. The dough is now ready to be filled.
by Sam Tackeff | Mar 30, 2009 | Baking, Challenge, Daring Bakers, Italian, Pasta
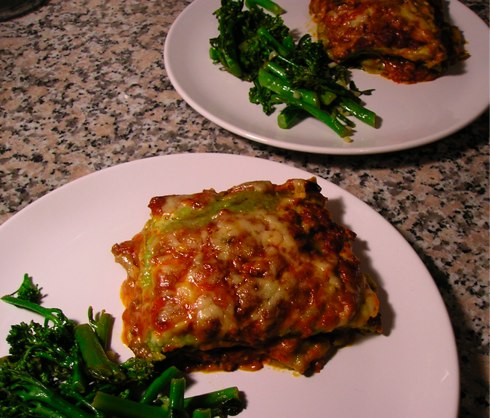
Daring Bakers. The March 2009 challenge is hosted by Mary of Beans and Caviar, Melinda of Melbourne Larder and Enza of Io Da Grande. They have chosen Lasagne of Emilia-Romagna from The Splendid Table by Lynne Rossetto Kasper as the challenge.
Every month, hundreds of bakers across the world band together in an effort to push their own culinary boundaries. Daring bakers is certainly not thirty minute meals. This month, we were making lasagna of Emilia-Romagna, a three part adventure which included home made spinach pasta, a home made ragu, and a creamy béchamel.
Ok, I thought. I’m going to make lasagna from scratch this month. Well I have another confession to make. I really, really, really enjoy Stouffers lasagna. Somehow, even after microwaving the stuff instead of baking it, it fulfills my every need and want. Somehow, this microwave boxed food is entwined with thoughts of Italian grandmothers slaving away in the kitchen, and remarkably the deception pulls itself off. Somehow, even though it pains me to say it, I love the stuff. So the idea of making a real lasagna, all from scratch… a challenge that would no doubt be fun to make, and delicious, was intriguing… but could it beat my trusty standby? You laugh, maybe you even scoff, but I was skeptical.
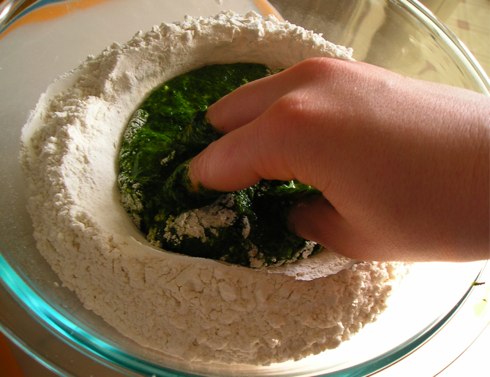
Challenge part #1: Homemade spinach pasta. Home made pasta is incredibly easy to make. You take just a few ingredients, usually just flour and egg, and mix, knead, roll, and voila- just a few minutes in a boiling pot of water, and done! The only difficult part: rolling out the dough. I’d highly prefer doing it with a Kitchen Aid mixer with the pasta attachment, but alas, all I have here is my own forearms, and a nice silpat rolling pin.
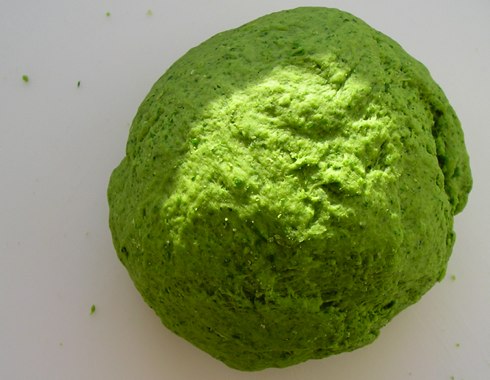 Another wonderful bonus of home made pasta is that the pasta dough is another good place in which to hide vegetables in for the picky eater. For this pasta, I used two eggs, 3.5 cups of flour, and I added spinach, about 6 ounces of defrosted frozen spinach, which I had emulsified with my hand held emulsifier. This makes the paste smooth, and easily workable into the dough. If I were to do this dish again, I’d probably add some basil as well, but you could easily puree any vegetable and add it to a basic dough.
Challenge part #2: A delicious ragu. For this part, I did a cheat move, using jarred pasta sauce as a base. I added meat, and cooked it for about an hour, so ultimately it doesn’t save any time, just imparts some fantastic flavor. Yes, part of it was jarred, but I don’t feel bad. The stuff is delicious.
“Cheats Ragu”
1/2 onion
an ounce of bacon
1/2 lb ground veal
1/4 cup of red wine
a jar of really good store bought tomato sauce
(I used Trader Joes Rustico- Southern Italian sauce), but I might easily have substituted barilla.
Saute the onion for about ten minutes, with some good olive oil. Add the bacon, and saute, add the half cup of wine, and cook for a minute, dump in the jar of pasta sauce. Cover really loosely (more of a stain catcher), and stir occasionally, cooking at a slow bubble for about 45 minutes or more.
Challenge part #3: A Bechamel (white sauce) This is the key to a rich, hearty lasagna. In a medium saucepan, melt 4 tablespoons of butter, and then sift in 4 tablespoons of flour, whisking it all until smooth. Slowly whisk in 2 2/3 cup of milk, whisking constantly to avoid lumps forming. Bring to a slow simmer, and stir until the sauce thickens, about seven or eight minutes. Season with salt, pepper, and most importantly some freshly grated nutmeg. The nutmeg imparts the most wonderful flavor that gives the whole lasagna something special.
Finally, with the three parts prepared, I put together the lasagna, layering the (boiled) pasta, sauces, and some freshly grated parmesan, and baked it all (covered loosely with foil) for 40 minutes at 350 degrees F.
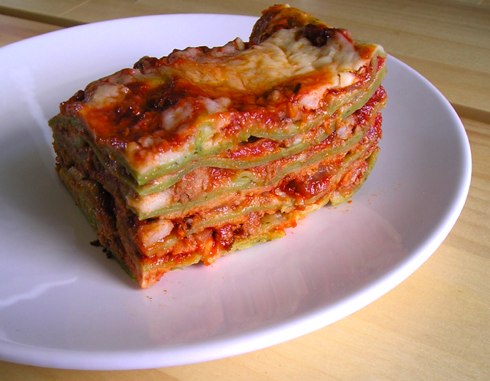 Ultimately, this lasagna was delicious. Painfully delicious. As in my forearms. All of the rolling. I spent three days eating it, hot, cold, microwaved, for breakfast, until I could lasagna no more. Was it better than my Stouffers? Er… Yes. Would I make it again? Yes. Although, probably sooner if I had a Martha Stewart Blue Kitchen Aid Mixer. (Hint, hint…. nudge, nudge…) Until then, I’ll savor this experience.
Aside: If anyone is interested in slaving away recreating this, I have the longer, much more detailed recipe for the pasta and assembly that I would be more than willing to email.


 Another wonderful bonus of home made pasta is that the pasta dough is another good place in which to hide vegetables in for the picky eater. For this pasta, I used two eggs, 3.5 cups of flour, and I added spinach, about 6 ounces of defrosted frozen spinach, which I had emulsified with my hand held emulsifier. This makes the paste smooth, and easily workable into the dough. If I were to do this dish again, I’d probably add some basil as well, but you could easily puree any vegetable and add it to a basic dough.
 Ultimately, this lasagna was delicious. Painfully delicious. As in my forearms. All of the rolling. I spent three days eating it, hot, cold, microwaved, for breakfast, until I could lasagna no more. Was it better than my Stouffers? Er… Yes. Would I make it again? Yes. Although, probably sooner if I had a Martha Stewart Blue Kitchen Aid Mixer. (Hint, hint…. nudge, nudge…) Until then, I’ll savor this experience.