by Sam Tackeff | May 14, 2009 | Barefoot Blogging, Breakfast
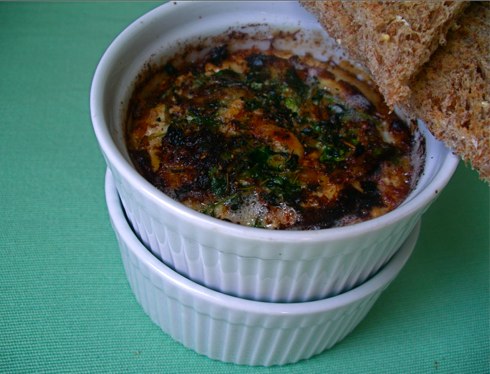
This weeks Barefoot Blogging backtracks to a recipe that I wasn’t around for – Ina Garten’s Herb Baked Eggs. Barefoot blogging is a group effort of those of us who absolutely adore the Barefoot Contessa, and are cooking our way through her recipes. It’s great fun.
I thought these eggs would be a perfect way to inaugurate my new ceramic ramekins, and use the broiler that I couldn’t figure out how to use – it’s one of those pull out drawers under the stove that I always thought was just intelligent storage space for baking pans.
The recipe couldn’t be simpler, and makes a really great breakfast to serve for company or just yourself in a matter of minutes. And it looks so pretty! I ate mine with some really fantastic bread from Alvarado Street Bakery.
Ina Garten’s Herb Baked Eggs
serves 2
Ingredients
– a half clove of garlic, freshly minced
– 1/4 teaspoon of minced fresh thyme leaves
– 1/4 teaspoon of minced fresh rosemary leaves
– 1 tablespoon of minced fresh parsley
– 1 tablespoon freshly grated Parmesan cheese
– 6 extra large eggs
– 2 tablespoons heavy cream
– 1 tablespoon unsalted butter
– Salt and Pepper
Method
1. Preheat the broiler for 5 minutes and place the oven rack 6 inches below the heat.
2. Combine the garlic, thyme, rosemary, parsley, and Parmesan and set aside. Carefully crack 3 eggs into each of 2 small bowls or teacups (you won’t be baking them in these) without breaking the yolks. (It’s very important to have all the eggs ready to go before you start cooking.)
3. Place 2 individual gratin dishes on a baking sheet. Place 1 tablespoon of cream and 1/2 tablespoon of butter in each dish and place under the broiler for about 3 minutes, until hot and bubbly. Quickly, but carefully, pour 3 eggs into each gratin dish and sprinkle evenly with the herb mixture, then sprinkle liberally with salt and pepper. Place back under the broiler for 5 to 6 minutes, until the whites of the eggs are almost cooked. (Rotate the baking sheet once if they aren’t cooking evenly.) The eggs will continue to cook after you take them out of the oven. Allow to set for 60 seconds and serve hot with toasted bread.
by Sam Tackeff | Mar 26, 2009 | Barefoot Blogging, Cheese, Food Travel
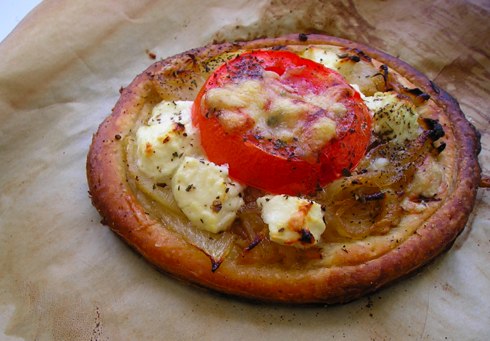 This weeks Barefoot Blogging challenge, chosen by the lovely Anne of Anne Strawberry is one of my favorite recipes of Ina’s, her absolutely delicious Tomato Goat Cheese Tarts. These tasty tarts have two types of cheese: goat, and another melty cheese (Ina uses parmesan, but I used fontina this time to fulfill Adventures in Gluttony’s Cheese of the Month Challenge) and so really, how can you go wrong? It’s also a fairly great base recipe for getting in your vegetables, as you could easily top on a variety of seasonal vegetables and it would work out fantastically.
In order to serve them justice, (and admittedly to get out of the city for some quiet), I decided to go on a quest for cheese outside of San Francisco. We hopped in the car in the early afternoon, and drove across the golden gate bridge, heading up the coast for the country. Cheese, an ocean view, sunshine, farm land, and cows are among my criteria for excellent adventuring, and all were successfully met on this trip.
 We drove up the 101 to Petaluma, and then across towards Tomales, a tiny town on the 1, where we stopped at Mostly Natives Nursery so I could buy some herbs for my kitchen including a rosemary bush, some cilantro, parsley, marjoram, oregano, two types of thyme, and mint. I’m used to having a garden with fresh herbs, and now living on the third floor with no land, I’ve been missing out. I’m hoping these guys will pull through living in the house by the windows! We wanted to go to Tomales Bakery, but it is only open Thursdays through Sunday, so we continued back down the incredibly beautiful coastline, driving past Tony’s, and Hog Island Oyster Company (two food destinations which I will get to some point soon!), and towards Point Reyes.
 Point Reyes, in addition to being in the middle of beautiful farm land, right on Tomales Bay, is home to Cowgirl Creamery, the main destination of my cheese quest. After sampling, sampling and more sampling, I settled on three cheeses. Fontina, to satisfy my Cheese of the Month, some more of an aged gruyere that I purchased a few weeks ago in Cowgirl’s Ferry Building store, and some really remarkable goat cheese, called Hoja Santa. Hoja Santa is made in Dallas by Paula Lambert of the Mozzarella Company, and is wrapped in the leaves of the Hoja Santa plant, which is supposed to impart the taste of sassafras to the cheese. After sampling it, I knew it was the one for Ina’s tarts.
 Today I made these tarts for lunch, and couldn’t have been a happier camper. So delicious!
Tomato and Goat Cheese Tarts
adapted from Ina Garten
Serves 2
Ingredients:
– 1 sheet of puff pastry, defrosted
– extra virgin olive oil
– 1/2 large onion, thinly sliced
– 1 clove garlic
– coarse salt and black pepper
– 2 tablespoons dry white wine
– 2 teaspoons minced fresh thyme leaves
– 4 tablespoons freshly grated Fontina, with some shaved
– 2 ounces goat cheese (I used plain, but Ina recommends herb and garlic Montrachet)
– 2 thick slices of tomato (about 1/4 inch) from a medium tomato
– a few teaspoons of julienned basil (use fresh if at all possible, but it works fine with dried)
Method:
1. Preheat the oven to 425 degrees.
2. Take a sheet of defrosted puff pastry (I used Trader Joe’s Artisanal Puff Pastry, frozen, which comes in big sheets), and draw six inch large circles of pastry, using a bowl or saucer as your guide. Place pastry rounds on a sheet pan lined with parchment, and stick in the fridge to keep them cold until you are ready to use them. (Note: quickly take the leftover scraps, sprinkle them with cinnamon and sugar, and put them in the oven for the next ten minutes or so while you cook the onions. They make a fantastic snack.)
3. In a pan on medium heat, add a couple of good glugs of olive oil, and saute the onion and garlic for about 15 minutes until starting to get very soft. Season with salt and pepper, add the white wine and thyme leaves. Turn the heat down just slightly, and cook for another 10 to 15 minutes until very soft and lightly browned. Take off the heat.
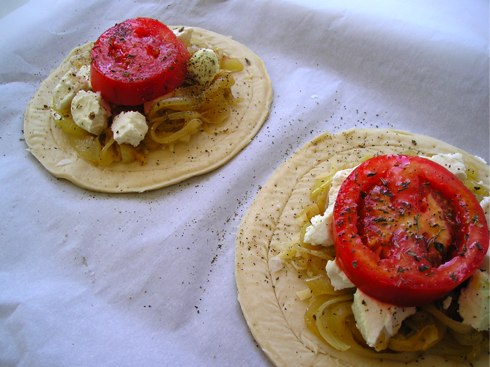
4. Now for the fun part: take your pastry rounds, and with a sharp knife, score a 1/4 inch wide border around the inside of the edge of the circle. Sprinkle about a tablespoon of the fontina cheese on each round, staying inside the scored border. (This is so when baking, the border will rise and create a little edge.)
5. In each circle, place half of your sauteed onions inside the border, and crumble an ounce of the goat cheese. Take your tomato and plop it on top, brushing it with a little bit of olive oil, giving it a sprinkle of salt, pepper, and the basil, and the rest of the fontina cheese.
6. Bake for 20 minutes, until the pastry is golden. You might want to watch it in the end, because if your oven is too hot or uneven it might start to burn. You can serve it on its own, or with a little lemony salad with arugula, and any leftover tomato you might have.
by Sam Tackeff | Mar 12, 2009 | Barefoot Blogging, Poultry, Quick and Easy
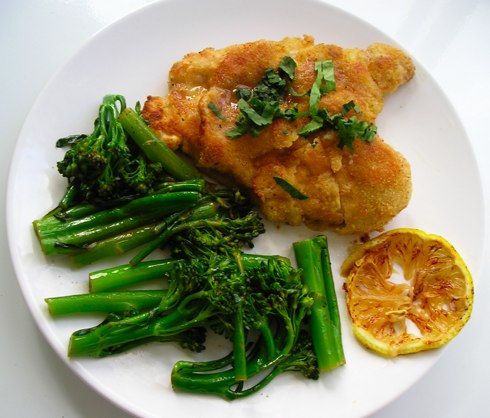
This Thursday’s barefoot blogging challenge was chosen by Lindsey of Noodle Nights and Muffin Mornings, and had us all in the kitchen cooking Ina Garten’s Chicken Piccata. Now, to be fair, because there are no capers in this dish, I’m not sure how she gets away calling it a piccata, but nevertheless it’s certainly tasty.
I chose to accompany the dish with some Sautéed Broccolini (for BB extra credit, chosen by Mary, of Meet Me in the Kitchen). I suppose you could pair this chicken with almost any vegetable (green beans, regular broccoli, and swiss chard come to mind), and just sauté them the same way in your pan- it tastes infinitely better if you do it in the pan right after you make your delicious piccata sauce, so it absorbs all of that wonderful lemony flavor.
Other things you could do with this chicken: I think that this would taste equally tasty on a nice bit of ciabatta bread with some arugula as a sandwich, or served over some pasta with freshly grated Parmesan. My mother also makes a similar dish served with a side of sauteed cabbage and onions, over farfalle pasta, that my brother swears by.
Breading Chicken: To bread your chicken, it’s easiest if you have a little lineup set up. You can do it in plates, but I think that bowls make it all a lot cleaner.
 Some things about online recipes to keep in mind: Sometimes, the recipe gets translated badly onto the food network, or other recipe posting sites online. Most of Ina’s recipes are for four in her cookbook, and yet somehow the food network versions are for two, with some errors (like enough sauce and breading ingredients for four, but only calling for two pieces of chicken). I find that I tweak many of the recipes posted here online, although the recipes in her book are usually winners.
Crispy Lemony Chicken
serves 4
adapted from Ina Garten
4 boneless, skinless chicken breasts, pounded to 1/4 inch thick
salt and pepper
1/2 cup flour
1 extra-large egg
3/4 cup seasoned dry breadcrumbs (I used plain that I seasoned with my own spices)
Extra Virgin Olive Oil
3 tablespoons unsalted butter at room temperature
juice of 2 lemons
1/2 cup dry white wine
Chopped parsley leaves, for serving
Method
1. Preheat the oven to 400 degrees fahrenheit. Line a sheet pan with parchment paper.
2. To pound your chicken, place the breast between two sheets of parchment paper or saran wrap, and pound flat with a heavy object. *Thin chicken breasts are really important so that the chicken cooks quickly and evenly.* Season with salt and pepper, and set aside.
3. Create your breading line: I like using three bowls (see above). In the first bowl, put the flour, with 1/2 teaspoon of salt, and 1/2 teaspoon of pepper. In the middle bowl, crack in one extra large egg, and a 1/2 tablespoon of water. In the third bowl, place your breadcrumbs. Now comes the fun part! Dip each chicken breast- first in the flour, to coat lightly, then in the egg mixture, and finally in the breadcrumbs. (You will have enough leftover in the bowls if you want to make extra chicken.)
4. In a large sauté pan, heat 1 tablespoon of olive oil over medium-low heat. Add the chicken breasts, and cook for 2 minutes on each side, until the crust is nicely browned. Place them on the sheet pan, and then bake in the oven for about 5 minutes while you make the sauce.
5. In the same saute pan that you have cooked the chicken, add a tablespoon of melted butter, then add the lemon juice, the wine, some salt and pepper. Boil for a few minutes over high heat, until it reduces by half, and then take off the stove and swirl in the extra two tablespoons of butter. Set aside in a bowl, and use the pan to make whatever vegetable you are serving it with.
6. Plate the chicken, pour on some sauce, add the fresh parsley, and serve with a wedge of lemon. It’s a surprisingly light and refreshing dish!
Sauteed Broccolini
serves 2
Ingredients
1 small bunch broccolini
1 tablespoon unsalted butter
1 small clove of garlic, minced
Juice of half a lemon
1/4 teaspoon of ground black pepper
Juice of half a lemon
Method
Steam the broccolini with a few tablespoons of water in the microwave for three minutes, and drain. In the pan that was used for the lemon sauce, add a the butter, garlic and lemon juice, salt and pepper, and heat as the broccolini steams. Add the drained broccolini to the pan and sauté for a minute or two, turn off the heat, and plate.
by Sam Tackeff | Feb 26, 2009 | Baking, Barefoot Blogging, Challenge

A few weeks ago, I discovered Barefoot Bloggers, a group of people who love Ina Garten, the Barefoot Contessa, just as much as I do, and who have joined together to cook through her marvelous recipes. The next recipe on the list was Ina’s Meringues Chantilly, chosen by BMK of Reservations Not Required Fantastic! I love meringues! But the question was, would it be possible to make it in my kitchen in time to post today? You see, there are rules about meringue. Fresh eggs! Metal bowl! Only on a sunny dry day! That was the one I was the most worried about…. this is San Francisco… a sunny dry day? Oh dear.
I scanned the recipe list.
My first challenge: Cream of Tartar. Hmmm.. I’ve always had cream of tartar lying around, but now I don’t have any in my new kitchen. So began the search for cream of tartar. Apparently, it’s not really something that you just buy here. Four stores later, I finally found some overpriced cream of tartar and bought it. There is nothing like spending six dollars for something you are going to use a quarter teaspoon of. Sigh.
The next part was the eggs. According to the experts, you need the freshest eggs, to help break down the protein in the whipping process. I got mine from Omnivore Books on Food, where Celia, the owner sells fresh eggs from her neighbor’s farm in addition to her well chosen selection of cook books and books on food. These eggs are the absolute best, with really big orange yolks (which because they were omitted from this recipe are about to end up in a custard).
Now for a metal bowl. I didn’t have a metal bowl, but I had a glass pyrex. Would this work well enough? According to the experts, glass should work fine- the key is not to use plastic, because the fat from previous cooking might stick to it and ruin your meringue.
Finally, Ina’s recipe called for orange liqueur, and framboise, a raspberry liqueur, although all the hard liquor I had in my house is… Seagrams Whiskey. I know. I was the queen of the liquor cabinet. Four years of collecting the finest alcoholic libations in my dorm room, and all I have now is a bottle of whiskey, in a plastic jug no less. Because my current priority is paying my rent rather than paying for the expansion of my liquor cabinet, I opted to substitute the whiskey.
Finally I was ready to make the meringues.
…And it rained hard, down pouring rain for three days. I just couldn’t do it. The experts tell you to avoid moisture- not even to run your dishwasher or boil a kettle!
Just two days ago, the sun broke through the clouds and I was prepared to make the recipe. I went to the cabinet and…. apparently we didn’t have a hand held mixer. How could I forget! Oh god, I’ve whisked meringue before, and it’s a long, arduous process with no real assurance that they will even stiffen into peaks. A quick panic led to the obvious thought- I live in an apartment building now! I could borrow a mixer!! Huzzah!! So, with the great kindness of my neighbor Khrista, the following recipe was accomplished.
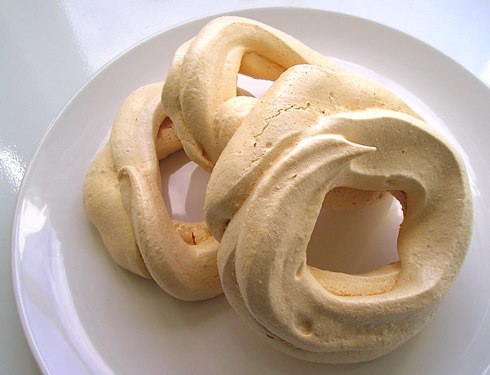
The original recipe is here, but the following was my adaptation that given there are just two of us, would feed a few less than the intended recipe.
Meringues Chantilly
adapted from the Barefoot Contessa
makes 6 meringue cups
Ingredients
– 3 extra- large egg whites, at room temperature (make sure there is no yolk!)
– 1/8 teaspoon cream of tartar
– a pinch of kosher salt
– 3/4 cup granulated sugar, divided
– 1/4 teaspoon pure vanilla extract
– Whipped Cream, see below
– Stewed Fruit, see below (cooled slightly or it will melt your whipped cream)
Method
1. Preheat the oven to 200 Farenheit. Line a baking sheet with parchment paper (or a silpat, or foil, which is all I have and works fine).
2. Beat the egg whites, cream of tartar, and the salt on medium speed until froth. Add half a cup of the sugar, and increase the speed to high until the egg whites form very stiff peaks. Whisk in the vanilla, and carefully fold in the remaining quarter cup of sugar into the meringue.
3. Put meringue into a piping bag with a large star shaped pastry tip, or if you are me, you put it into your ziplock bag in which you have attempted to cut a star shaped tip into one of the corners. Pipe into 3 1/2 inch or so circles.
4. Bake for 2 hours, until the meringues are dry and crisp, but not browned. Then turn off the oven, and wait for four hours, or overnight. Frankly though, I think you can use them right away and they would be fine, if not even better (I like a less dry meringue).
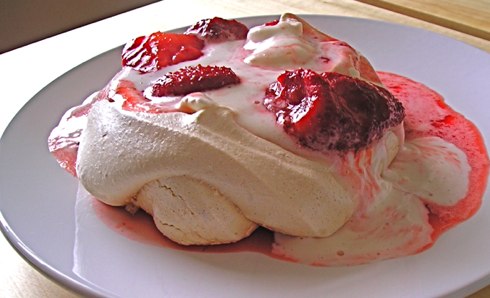
5. On a plate or bowl, spread some of the sauce from the stewed berries, place the meringue, fill with a dollop of whipped cream, and top with the fruit and eat.
Stewed Strawberries:
1/8 cup sugar
1/8 cup water
1 teaspoon whiskey
1/8 teaspoon orange zest
Combine all the ingredients in a saucepan, and bring to a boil. Lower the heat, and cook uncovered for a few minutes, allowing the sauce to get syrupy.
Whipped Cream:
Because I was not making the whipped cream for the entire recipe, I simply used about a 1/4 cup of cream and whipped it until stiff, whipped in a teaspoon or so of sugar and some vanilla, and a tiny bit more of the whiskey. It worked wondrously.
Ina’s recipe though calls for a pint of cold heavy cream, two tablespoons of sugar, two teaspoons of vanilla extract, and a tablespoon of orange liqueur. Well, next time!


 This weeks
  We drove up the 101 to Petaluma, and then across towards Tomales, a tiny town on the 1, where we stopped at
  Point Reyes, in addition to being in the middle of beautiful farm land, right on Tomales Bay, is home to
  Today I made these tarts for lunch, and couldn’t have been a happier camper. So delicious!
 Some things about online recipes to keep in mind: Sometimes, the recipe gets translated badly onto the food network, or other recipe posting sites online. Most of Ina’s recipes are for four in her cookbook, and yet somehow the food network versions are for two, with some errors (like enough sauce and breading ingredients for four, but only calling for two pieces of chicken). I find that I tweak many of the recipes posted here online, although the recipes in her book are usually winners.


